After performing an experiment, the resulting data file can be opened and viewed in three different forms: Experiment view, Spreadsheet view, and Graph view. This topic deals with the Spreadsheet view.
See Also
Touring the TRIOS Workspace.
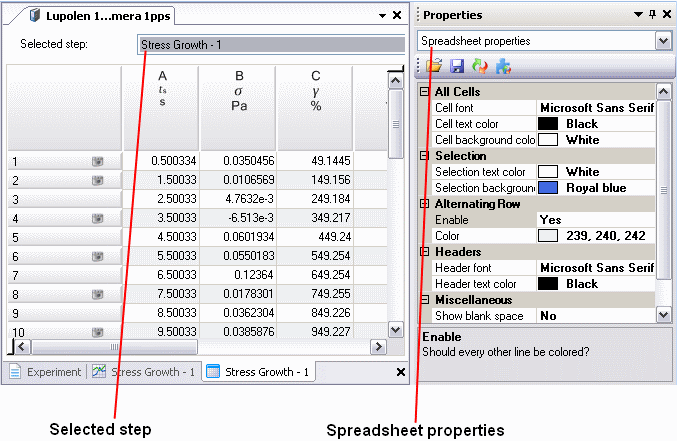
Most spreadsheet programs have a recognizable table layout. If you are new to using or setting up a spreadsheet, this topic will provide you with information needed to use the features. See the figure below for some of the components discussed here.
To comment on or annotate data on the spreadsheet, use spreadsheet markers to indicate items of note associated within a particular data point, cell, row, and/or column. Refer to the table below. See
Adding Markers to a Spreadsheet for additional information.
| Icon | Description | Location |
|
|
Image taken at this point | Row |
|
|
This item has been modified. | Cell, Column |
|
|
A comment has been added here. | Row, Column |
|
|
A bookmark has been added here. | Row |
|
|
An invalid point has been marked here. | Row |
The Spreadsheet view provides a tabular view of the data. The column configuration is based on the step test type. You can perform the following functions in Spreadsheet view:
See the table below for details on navigating within a spreadsheet.
| Function | Action Needed |
| Moving up/down within a column | Press the up/down arrow keys on your keyboard. |
| Moving right within a row | Press the TAB key or right arrow key on your keyboard. |
| Moving left within a row | Hold down SHIFT and press TAB or press the left arrow key on your keyboard. |
| Changing column width | Move your cursor over column border until the double-sided arrow is displayed. Click and drag the border to the desired position. |
| Selecting a row | Position your cursor over the numbered row in the first column and click. The entire row is selected. |
| Selecting a column | Position your cursor over the desired column and click. The entire column is selected. |
| Selecting multiple cells |
Position your cursor over the first cell, hold down the left mouse button and drag until you have selected the desired contiguous cells. Click in the first cell then hold down the SHIFT key and click in the last desired cell. Hold down the CTRL key while clicking in each desired cell. |
| Selecting all columns and rows | Position your cursor in the empty cell in the far left corner of the table and click. All columns and rows are selected. |
| Clearing a column or row | Select multiple cells in a column or row as above. Right click and select Delete from the pop-up menu. |
Any range of data can be copied to the clipboard from the spreadsheet and pasted into another application. Follow the instructions in the table below:
| Function | Action Needed |
| Copying an entry | Select the entry. Right-click and select Copy from the pop-up menu. |
| Copying a column or row | Click in the header above a column to select the column, or click in the numbered column to select the row. Right-click and select Copy from the pop-up menu. |
| Copying multiple cells | Select multiple cells in a column or row as above. Right-click and select Copy from the pop-up menu. |
To edit data, follow the instructions in the table:
| Function | Action Needed |
| Clearing a column or row | Select multiple cells in a column or row as above. Right-click and select Delete from the pop-up menu. |
| Editing a cell | Double-click on the entry. Click again to position the cursor. Backspace to delete and type to enter new values. |
| Adding/configuring columns or rows | See Configuring the Spreadsheet for instructions. |
| Marking data | See Adding Markers to a Spreadsheet for instructions. |
For information on exporting data, refer to the Exporting Data Help topic.
Print the spreadsheet as follows:
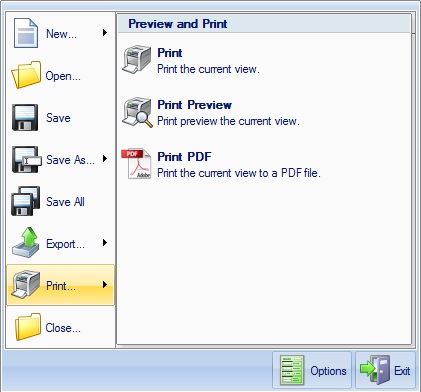
In addition to the default TRIOS file format, the spreadsheet can be saved in PDF format (.pdf), Universal Analysis format (.ua), or Orchestrator format (.rad). See below for more details.
Save the spreadsheet as a PDF file as follows:
Save the spreadsheet in .rad (Orchestrator) format or in .ua (Universal Analysis) format as follows:
